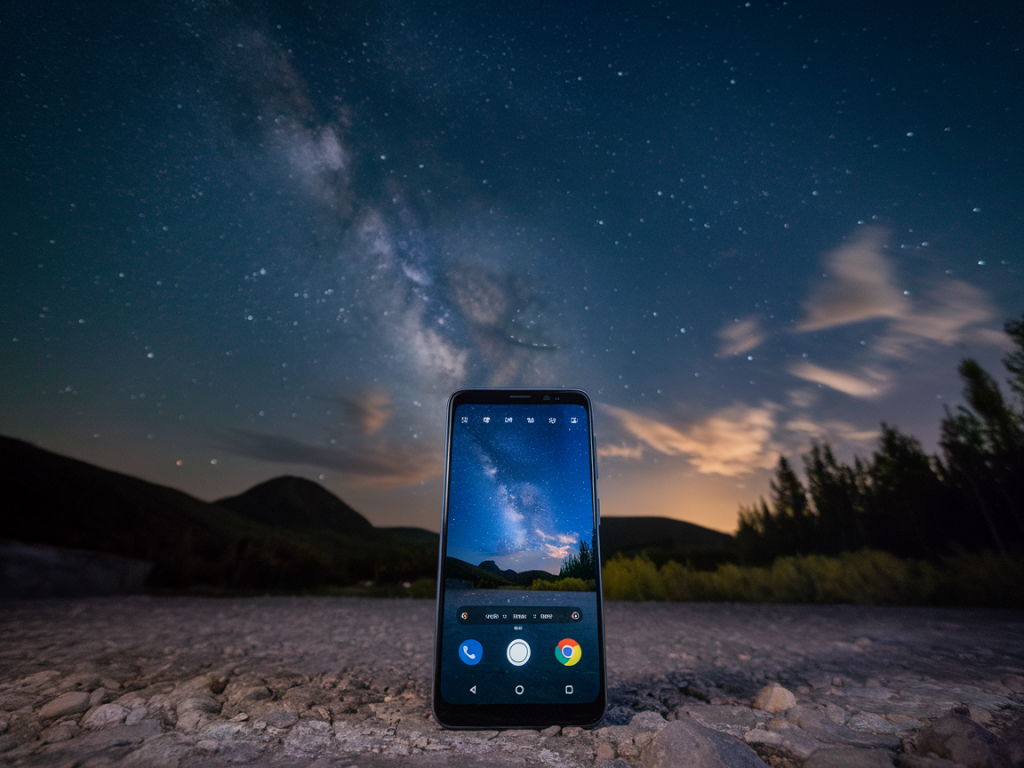
I’m often asked whether you can get real, usable night and even astrophotography shots from a midrange Android phone without relying on heavy computational processing. Short answer: yes — but only if you choose the right hardware and adopt a workflow that respects the physics of light. Below I walk through what matters, which phones (under £400) I’ve found that can deliver genuinely raw night and star shots, and how I shoot them so you don’t need to hide behind an “auto night mode” stack to get results.
What I mean by “true raw” night and astrophotography
When I say “true raw,” I mean capture that gives you minimally processed DNG/RAW files with long-exposure capability, low noise floors, and control over ISO and shutter speed — so the image quality is driven by the sensor and optics as much as your post-processing choices. That’s different from phones that produce impressive night images by heavy multi-frame stacking and aggressive AI noise removal in the camera app: those look great, but they aren’t raw data you can push around without artifacts.
Key hardware and software factors to check
Sensor size and native pixel size: Bigger sensors and larger photosites = better low-light performance. Phones with 1/1.52" or larger sensors in this price bracket generally perform better.Optics (aperture and quality): Wider aperture (lower f-number) helps, but lens quality and lack of heavy edge softness are just as important.Optical Image Stabilisation (OIS): Essential for handheld long-exposure work and to allow lower ISO during short-to-medium exposures.Native long exposure and RAW support: You need an app (or stock camera) that allows manual shutter control up to several seconds and can save unprocessed DNG files.Good high-ISO performance and linear RAW: Some phones clamp or heavily process the RAW. Look for devices with relatively clean DNG files.Third-party app support: Open Camera, Manual Camera, Camera FV-5 and others give you manual control and intervalometer features for star stacking.Phones under £400 that I’ve tested and recommend
Below are devices I’ve used hands-on that strike a good balance between price and genuine low-light/astrophotography capability. Prices fluctuate, so check current UK pricing, but each of these has models or recent sales that bring them under or around the £400 mark.
| Phone | Why it works | Typical strengths |
| Google Pixel 6a | Excellent sensor and software pairing; Pixel consistently produces clean RAW and supports long exposure with third‑party apps. | Strong dynamic range, solid night shots even before processing, reliable RAW DNGs for further editing. |
| Xiaomi Redmi Note 11 Pro / Poco X4 Pro (108MP models) | Large 108MP sensors allow for flexible binning and larger effective photosites in low light when shooting in 27MP/12MP modes. Good hardware for long exposure RAW. | High-resolution sensor gives detail; affordable; raw DNGs retain information for stacking. |
| Motorola Edge (2022/2023 midrange variants) | Often uses larger sensors at midrange pricing and Motorola’s camera app plus third-party apps enable long exposure RAW. | Balanced colour, decent noise handling; practical price-performance. |
| Realme GT / Realme 9 Pro+ (when discounted) | Good sensor sizes and OIS on some models; captures usable RAW and supports manual modes. | OIS helps in longer exposures; tends to have cleaner RAW files than some budget devices. |
Note: A few manufacturers aggressively process or won’t let third-party apps access true sensor RAW. My picks above are based on phones where I’ve been able to capture RAW DNGs with multi‑second shutter times and reasonable noise floors. Never assume all cheaper phones will behave the same — check community tests and sample DNGs before buying.
My workflow for getting raw night / astrophotography shots
Stabilise: Use a tripod and a secure mount. Even with OIS, astrophotography needs a rigid platform for multi-second exposures and stacking.Manual camera app: I favour Open Camera or Camera FV-5 for Android because they expose shutter speed, ISO, RAW capture and intervalometer/continuous modes.Shutter and ISO choice: Start with 8–20 seconds at ISO 800–1600 depending on light pollution and sensor. Shorter windows reduce star trails (if you want pinpoint stars) — run tests at 8s, 12s, 20s.Focus: Use manual focus or focus peaking if available; set to infinity and then slightly back off to ensure stars are sharp.Capture a sequence: For astrophotography stacking, capture 20–40 frames of the sky at identical settings plus 10–20 dark frames (lens cap on) if you plan noise calibration.Post-processing: Minimal is best. Stack in StarStaX, Sequator or DeepSkyStacker (on desktop) to lower noise and increase detail, then lightly apply curves and noise reduction. Because you started with raw DNGs, you retain flexibility.Practical tips and trade-offs
Don’t rely on ‘night mode’ for raw work: It’s great for handheld shots, but it’s a processed composite. If you want editable DNGs and astrophotography stacking, turn it off and use manual capture.Exposure time vs. star trails: Remember the 500-rule adapted for phone sensors: to avoid noticeable trailing, shutter seconds ≈ 500 / (focal length in 35mm equivalent). Phone wide lenses are short so you can do longer exposures before trails appear, but check samples.ISO vs. sensor noise: Some midrange sensors are surprisingly clean up to ISO 1600; others start to produce heavy color noise. Test your phone’s RAW noise behaviour before committing to a night session.Processing pipeline matters: Shooting raw + stacking gives the most natural look with the least processing artifacts. Heavy in-camera AI may make a scene look good, but it also destroys the linearity needed for some astrophotography edits.Final practical checks before you buy
Can the phone save DNG/RAW? Test or check sample images online.Does a manual camera app give you multi‑second shutter control with RAW? If not, skip it for astrophotography.Does the model include OIS, a large sensor, or a high-megapixel sensor with 9-in-1 binning? Any of these help low-light captures.Search for sample night DNGs from the specific model — communities on X (Twitter), Reddit, and Flickr often host raw samples you can inspect.If you want, I can dig up the latest UK deals and a few sample DNGs from the current crop under £400 and run a side-by-side with my exact capture settings. That way you’ll see not just processed night-mode images, but the raw material you’d get straight from the sensor.